Computer vision platform

Turn your photos into a working vision model.

Upload a few sample photos and describe what you need. VisionDock suggests the task and labels, checks your data, configures and runs training, and serves the model over a REST API. No ML team, no servers to manage.

  • Discovery to live API
  • 5 task types
  • REST API + edge bundle
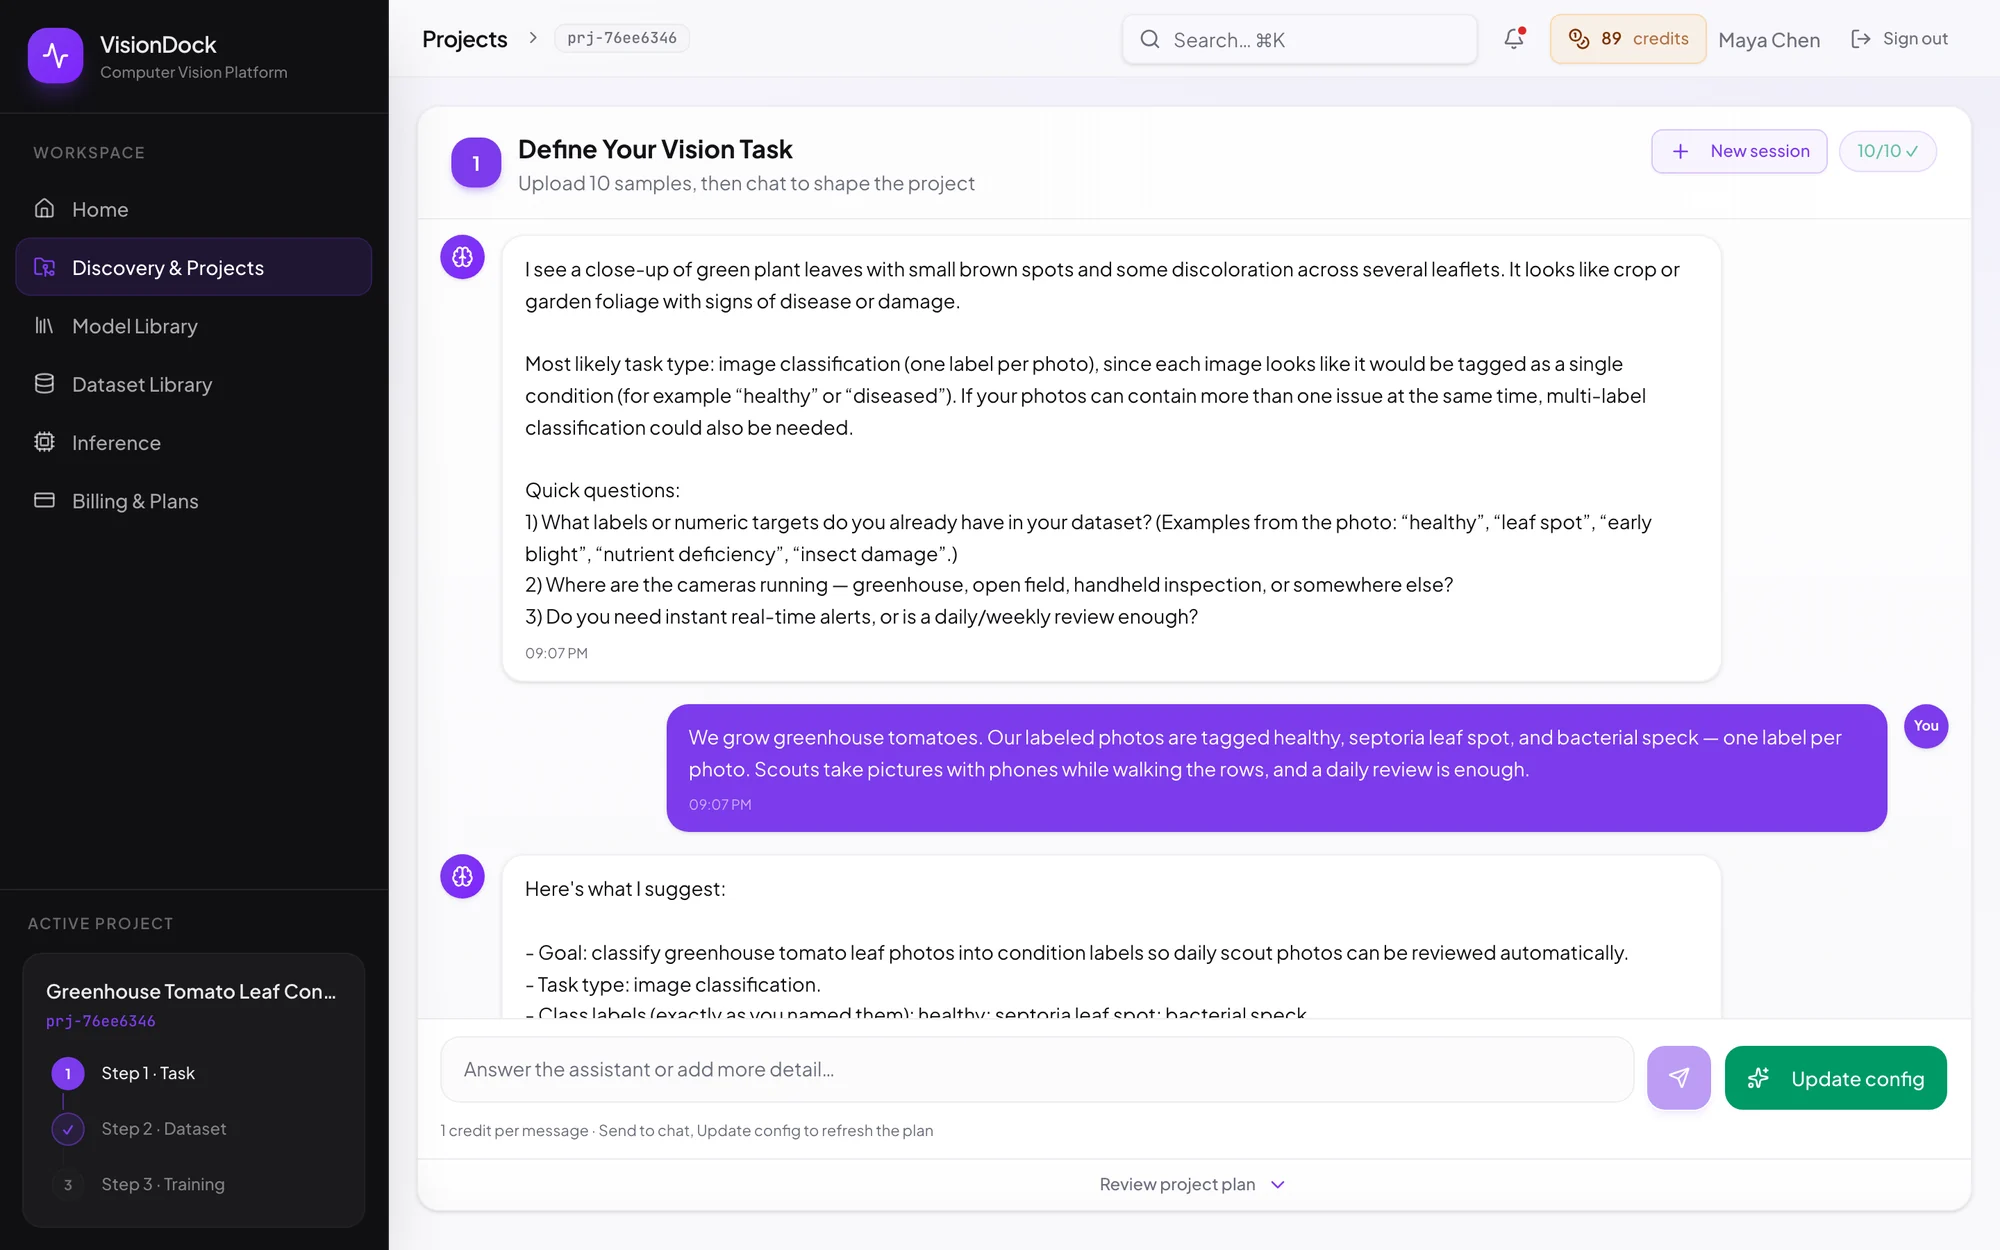
VisionDock discovery chat: the assistant has reviewed tomato leaf photos, recognised signs of leaf disease and recommends image classification

Real screen from VisionDock, not a mockup.

Ready-made datasets and models for
  • Manufacturing
  • Agriculture
  • Construction
  • Logistics
  • Sports
  • Self-driving
  • Gaming
  • Documents

Why VisionDock

Vision projects stall in three places. We removed all three.

01

Deciding “which model, which labels?” takes weeks.

Picking a task type, defining a label set and building a pipeline usually needs a computer vision specialist.

With VisionDock: upload 10 sample photos and a short chat suggests the task type and labels. One click turns the conversation into a project plan.
02

Training fails on the first run because of data formats.

Folder layouts, CSV headers, YOLO/COCO/VOC annotations… one mistake wastes an entire job.

With VisionDock: every task type is checked before training. Missing groups, too few photos and broken files are flagged up front.

03

Training and deployment are a project of their own.

Compute, endpoints, API keys, scaling, cost tracking — more work than the model itself.

With VisionDock: training runs on managed cloud compute, and the model becomes a REST endpoint in one click — without standing up your own infrastructure.

How it works

Four steps. From discovery to a live API.

Each step builds on the previous one. The screens below are from a real project, a greenhouse tomato leaf classifier, built in the product.

Step 01

Discovery — describe what you want

Upload 10 sample photos and write your goal in your own words. A vision-language model looks at the photos, asks a few clarifying questions and turns the conversation into a project plan.
  • Covers the essentials: goal, what to look for, camera environment and speed requirement
  • Automatic recommendation: classification, multi-label, regression, localization or detection
  • Project plan: task type, classes, expected dataset format and a suggested architecture
  • Shortcut: skip discovery by starting from a Model Library template or a Dataset Library dataset
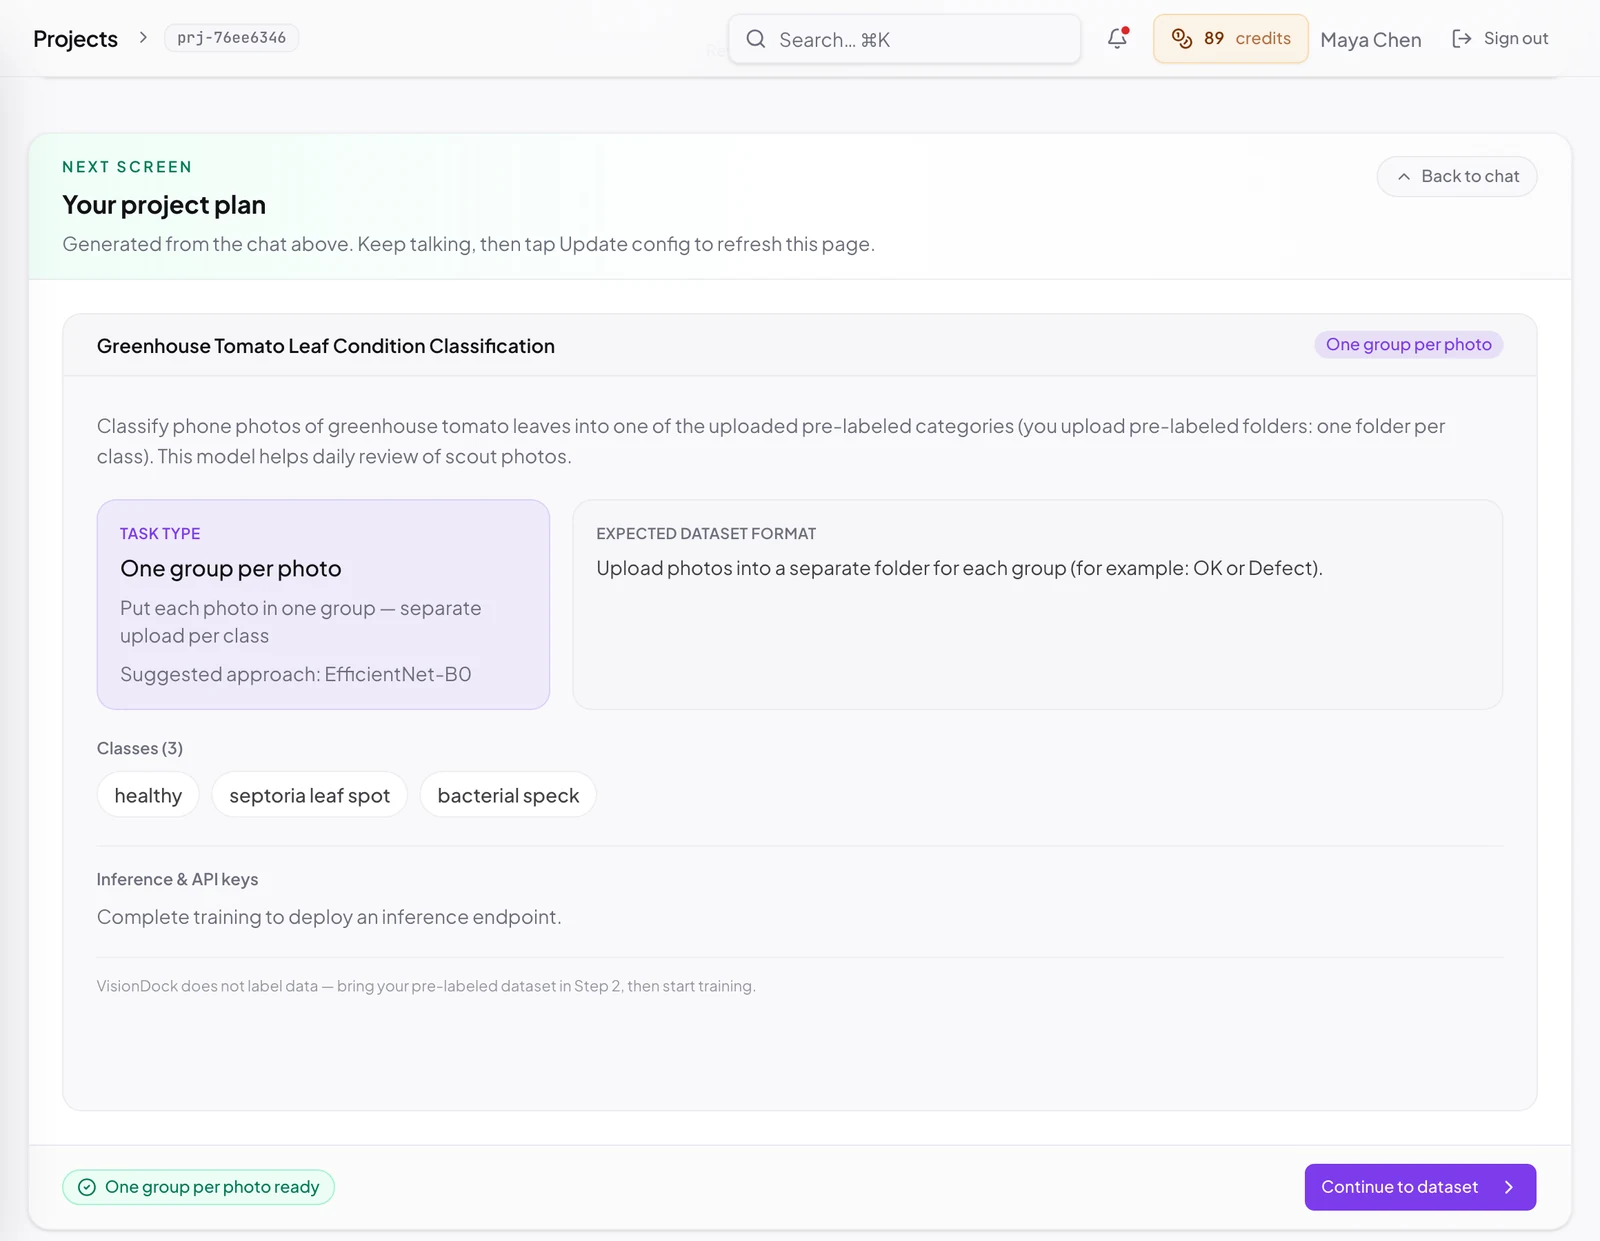
Project plan generated from the chat: Greenhouse Tomato Leaf Condition Classification, one group per photo, classes healthy, septoria leaf spot and bacterial speck, suggested approach EfficientNet-B0
The plan generated from a two-message chat.
Step 02

Data — upload it, get it checked

The expected format is spelled out for your task. As you upload, VisionDock checks that every group has enough photos and tells you exactly what's missing. Prefer ready-made data? Import a library dataset in one click.

  • Classification: one folder per group (e.g. healthy/, septoria/)
  • Multi-label / regression: photos plus a simple CSV
  • Localization / detection: an annotated ZIP in YOLO, COCO or VOC format
  • Readiness check: photo count per group, minimums and file problems before training
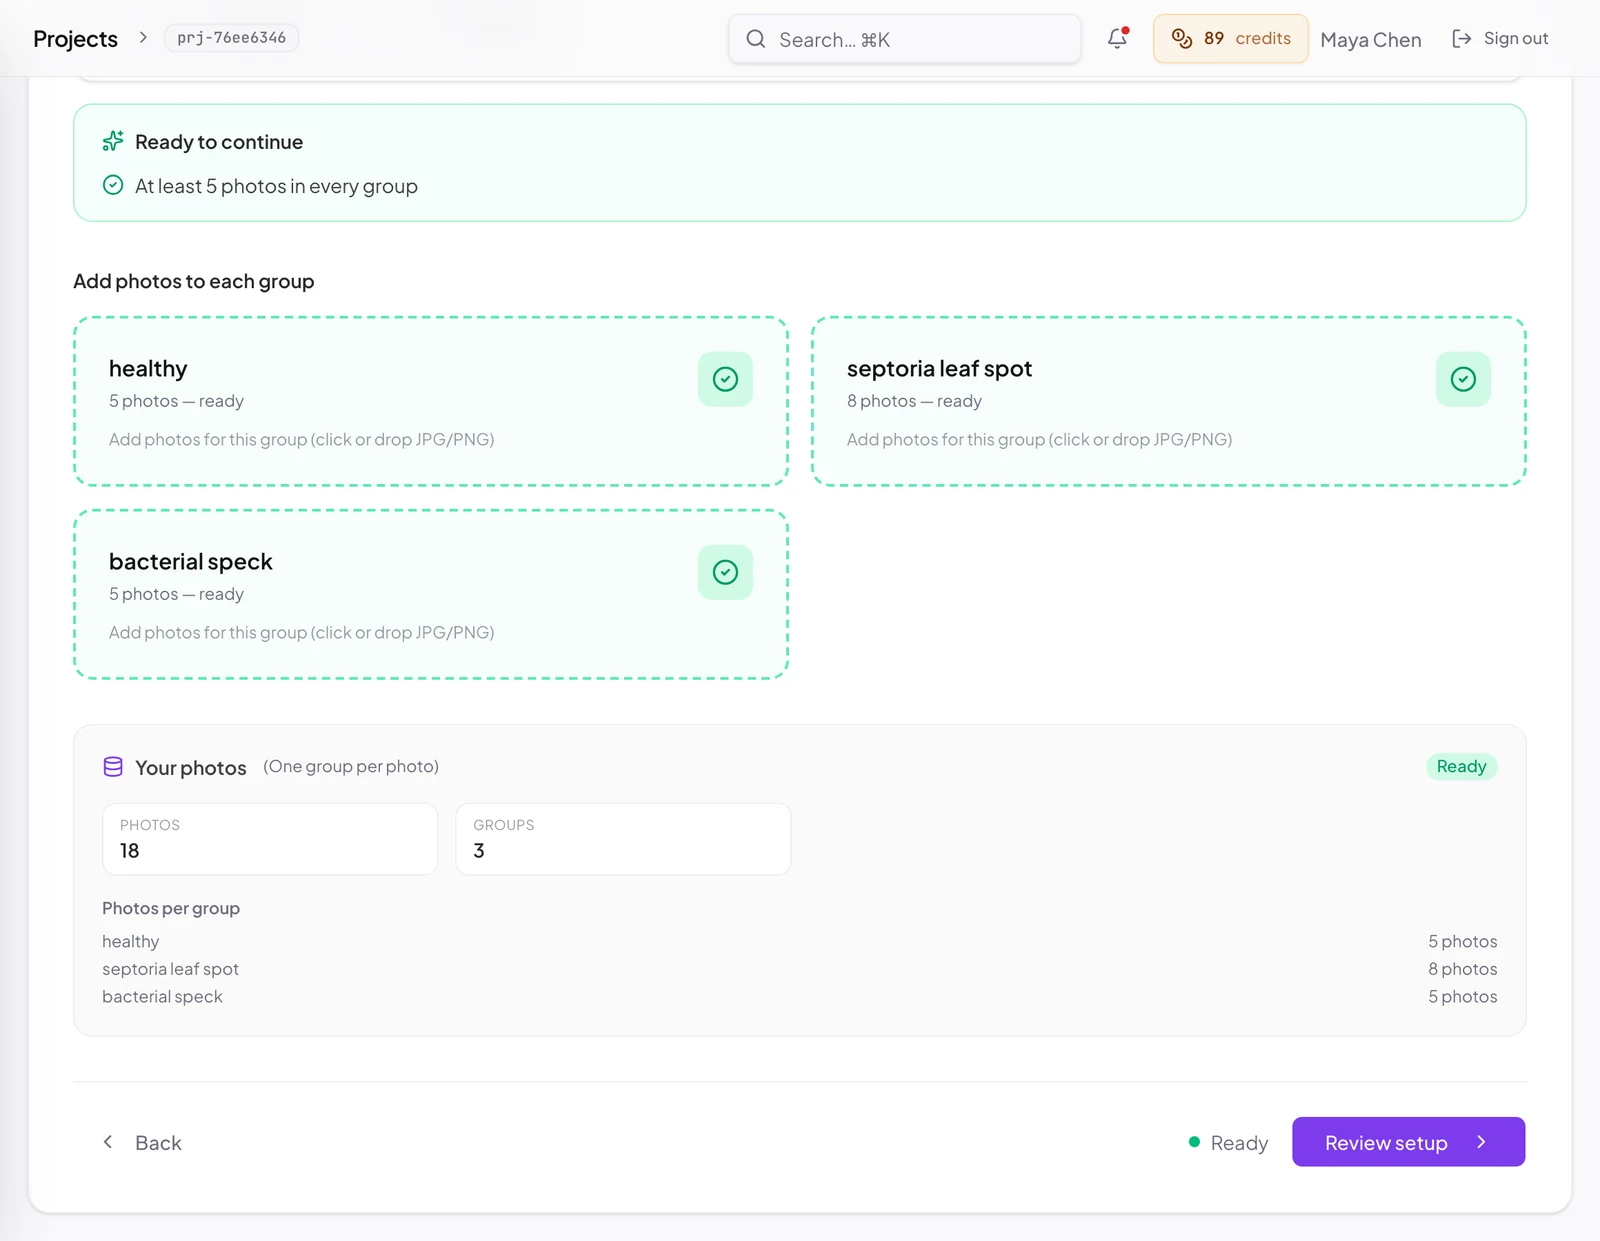
Dataset step: healthy 5 photos, septoria leaf spot 8 photos, bacterial speck 5 photos, all groups ready, 18 photos in 3 groups
18 labelled photos across 3 groups, checked and ready.
Step 03

Training — configured from your images

Before training, a vision model inspects your dataset and picks the settings: image size, augmentation, preprocessing and confidence threshold. Review or change anything, then start the run and watch its progress.

  • AI-configured: epochs, batch size, image size and augmentation (RandAugment, Mixup, CutMix) chosen for your data
  • Pipeline editor: resize, denoise, contrast boost, auto-orient and more, filtered by task type
  • Clear estimates: expected duration shown before you start, with live progress while the job runs
  • Control: monitor status and cancel at any time
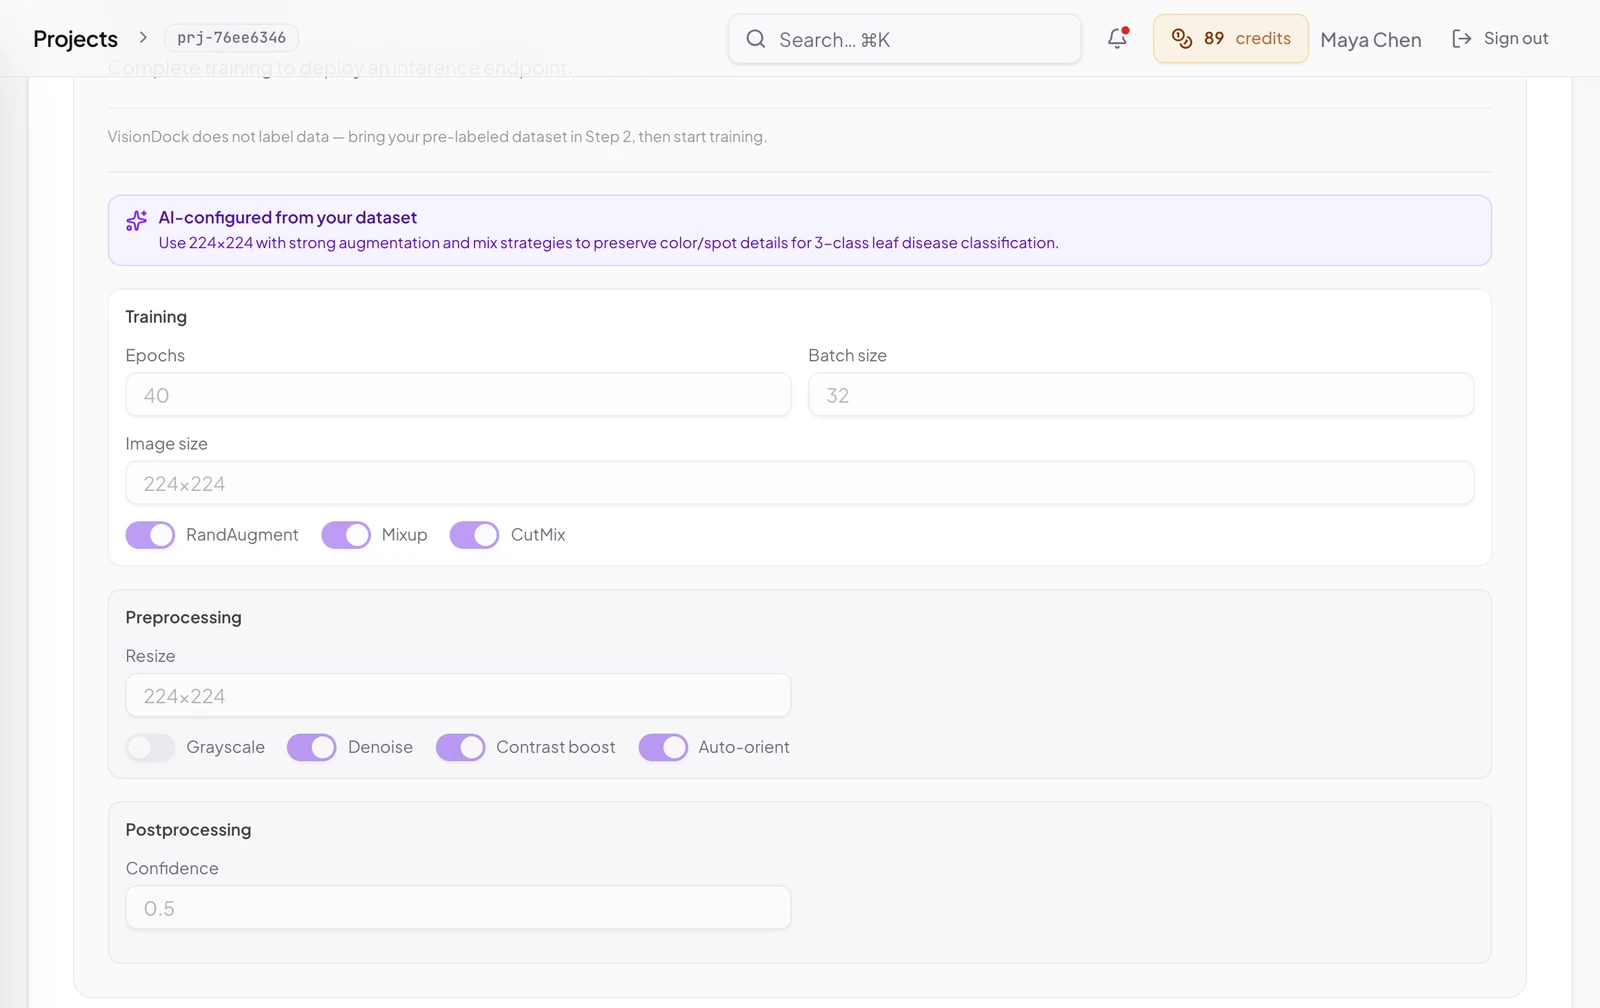
Training setup configured by AI from the dataset: 224x224 images, 40 epochs, batch size 32, RandAugment, Mixup and CutMix enabled, denoise, contrast boost and auto-orient preprocessing
“Use 224×224 with strong augmentation to preserve colour and spot details.” Chosen by the AI after looking at the leaves.
Step 04

Deploy — get an API key, run predictions

Push the trained model to a live endpoint in one click. Test it inside the app, create an API key and connect it to your own systems. Working in the field? Download the edge bundle.

  • REST endpoint: predict via file upload or base64 JSON
  • Detection options: confidence threshold, IoU, test-time augmentation, ensembling and SAHI slicing for large images
  • Key management: create, rotate and revoke API keys
  • Edge bundle: download the model and runtime files to run offline or on edge devices
$ curl -X POST "$ENDPOINT/predict" \
  -H "X-API-Key: $VISIONDOCK_API_KEY" \
  -F "image=@row12_leaf.jpg"

{
  "label": "septoria leaf spot",
  "confidence": 0.94,
  "scores": { "healthy": 0.02, "septoria leaf spot": 0.94, "bacterial speck": 0.04 }
}
Illustrative request and response shape for the tomato classifier.

A real project, start to finish

From 10 phone photos to a training-ready leaf disease model.

We ran VisionDock on real photos of greenhouse tomato leaves. Everything below is what the product actually produced. Nothing was staged.

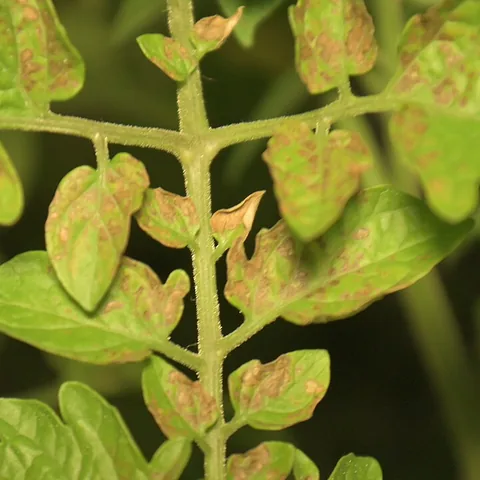
Tomato leaflets with septoria leaf spot
septoria leaf spot
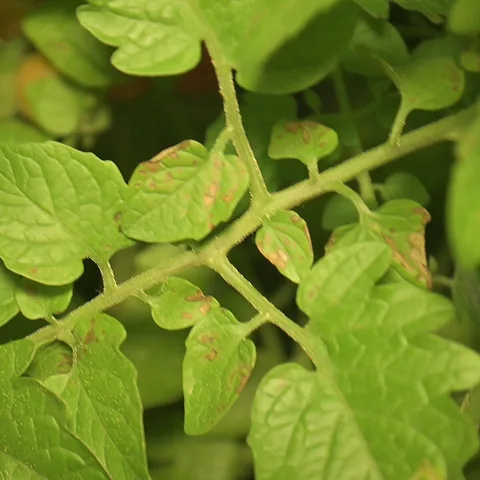
Close-up of septoria leaf spot lesions
septoria leaf spot
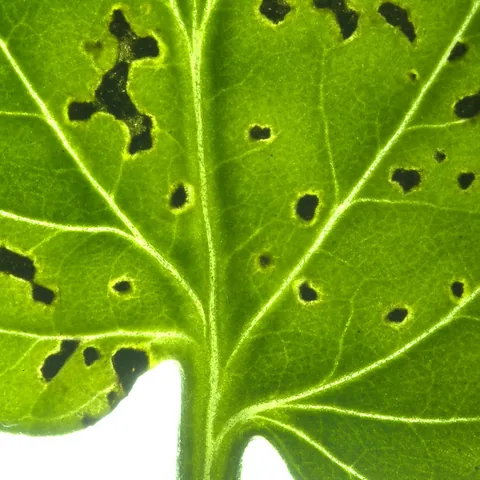
Backlit tomato leaf with bacterial speck lesions
bacterial speck
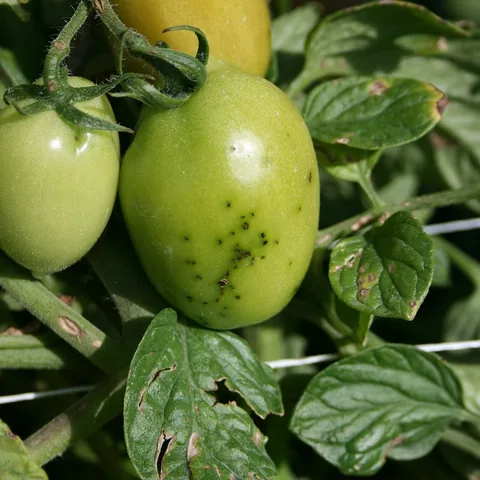
Tomato leaf with bacterial speck
bacterial speck
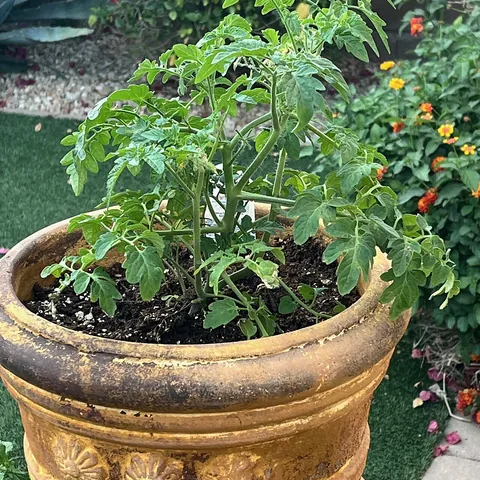
Healthy potted tomato plant
healthy
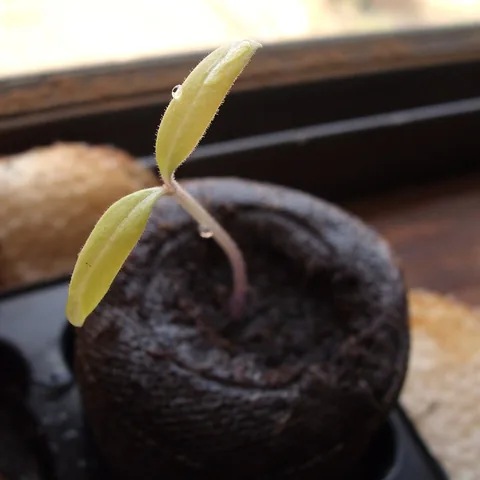
Healthy tomato seedling
healthy
  1. Discovery

    10 sample photos, 2 messages. The assistant spotted “small brown spots and discoloration”, recommended image classification and asked about labels, camera setup and speed.

  2. Project plan

    Generated in one click: 3 classes (healthy, septoria leaf spot, bacterial speck), folder-per-class format, EfficientNet-B0 suggested.

  3. Data check

    18 labelled photos uploaded into 3 groups. Each group passed the 5-photo minimum before training was allowed.

  4. Training setup

    Chosen by AI from the images: 224×224 input, 40 epochs, batch 32, RandAugment + Mixup + CutMix, denoise and contrast boost.

Sample photos: Wikimedia Commons, released under CC0 / public domain. Production models need far more than 18 photos; this run shows the workflow, not final accuracy.

Other things teams build with VisionDock

Manufacturing · Object detection

In-line defect detection

Find scratches, dents and missing holes, with their location, from a fixed camera on the line and pull defective parts immediately.

Agriculture · Regression

Ripeness scoring

Predict a 0–100 ripeness score per fruit, flag anything below the threshold and plan the harvest with the edge bundle running offline.

Logistics · Object detection

Parcel counting and damage checks

Count parcels on the belt, flag crushed or opened ones and notify your warehouse system over the API. SAHI helps with small objects on wide cameras.

Task types

Five task types. One interface, one workflow.

Discovery recommends the right type for you. All you have to bring is the right data.

Classification

One group per photo.

Examples: Healthy or diseased leaf. Part “OK” or “Defect”. Document type.

Data: one folder per group

Multi-label

Several tags per photo.

Examples: “Scratch + rust + stain” in the same image. Scene attributes. Clothing attributes.

Data: photos + label CSV

Regression

Predict a number from a photo.

Examples: Fruit ripeness score. Coating thickness. Fill level.

Data: photos + numeric CSV

Object localization

Where a single object is.

Examples: Label position. License plate location. Fiducial marker position.

Data: box-annotated ZIP (YOLO/COCO/VOC)

Object detection

Multiple objects: location + class.

Examples: Every defect on the line. Shelf product counts. Parcels on a conveyor.

Data: box-annotated ZIP (YOLO/COCO/VOC)

Not sure which fits?

Upload a handful of sample photos. The discovery chat recommends a task type and explains why — before any training starts.

Libraries

You don't have to start from scratch.

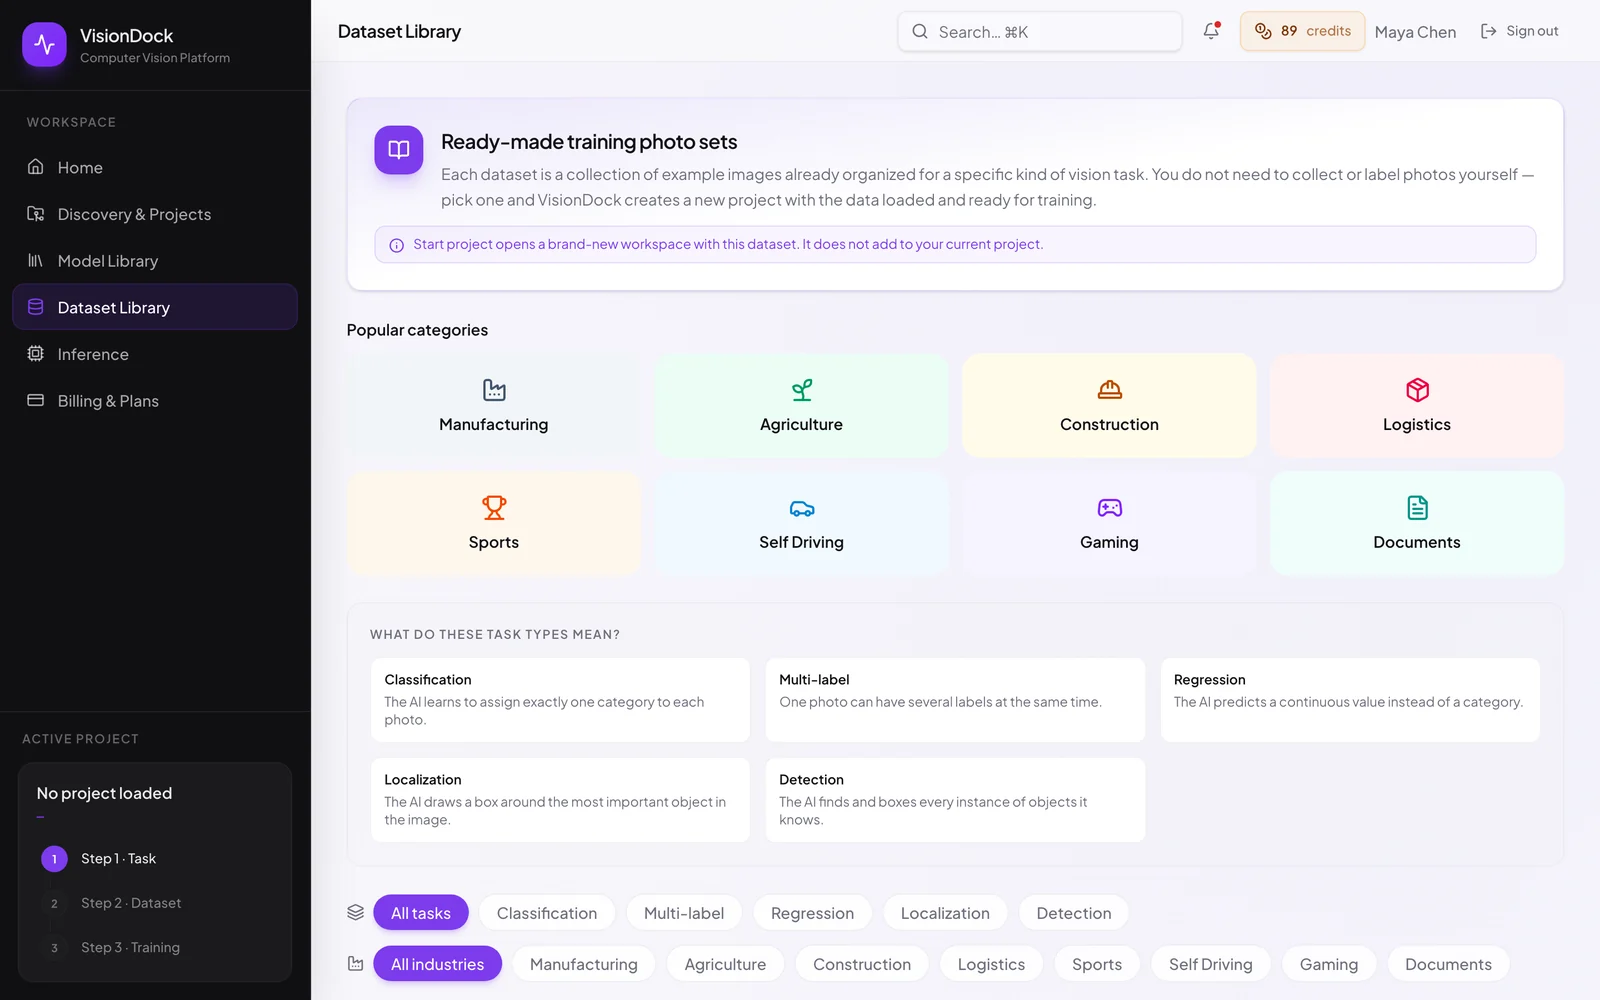
Dataset Library: ready-made training photo sets grouped by industry: manufacturing, agriculture, construction, logistics, sports, self driving, gaming, documents

Dataset Library

Ready-to-use datasets organized by industry and task type. Pick one and VisionDock creates a project with the data loaded and ready for training. No upload step needed.

  • Filter by task and industry
  • Sample previews before you start
  • Opens a fresh project with the data linked
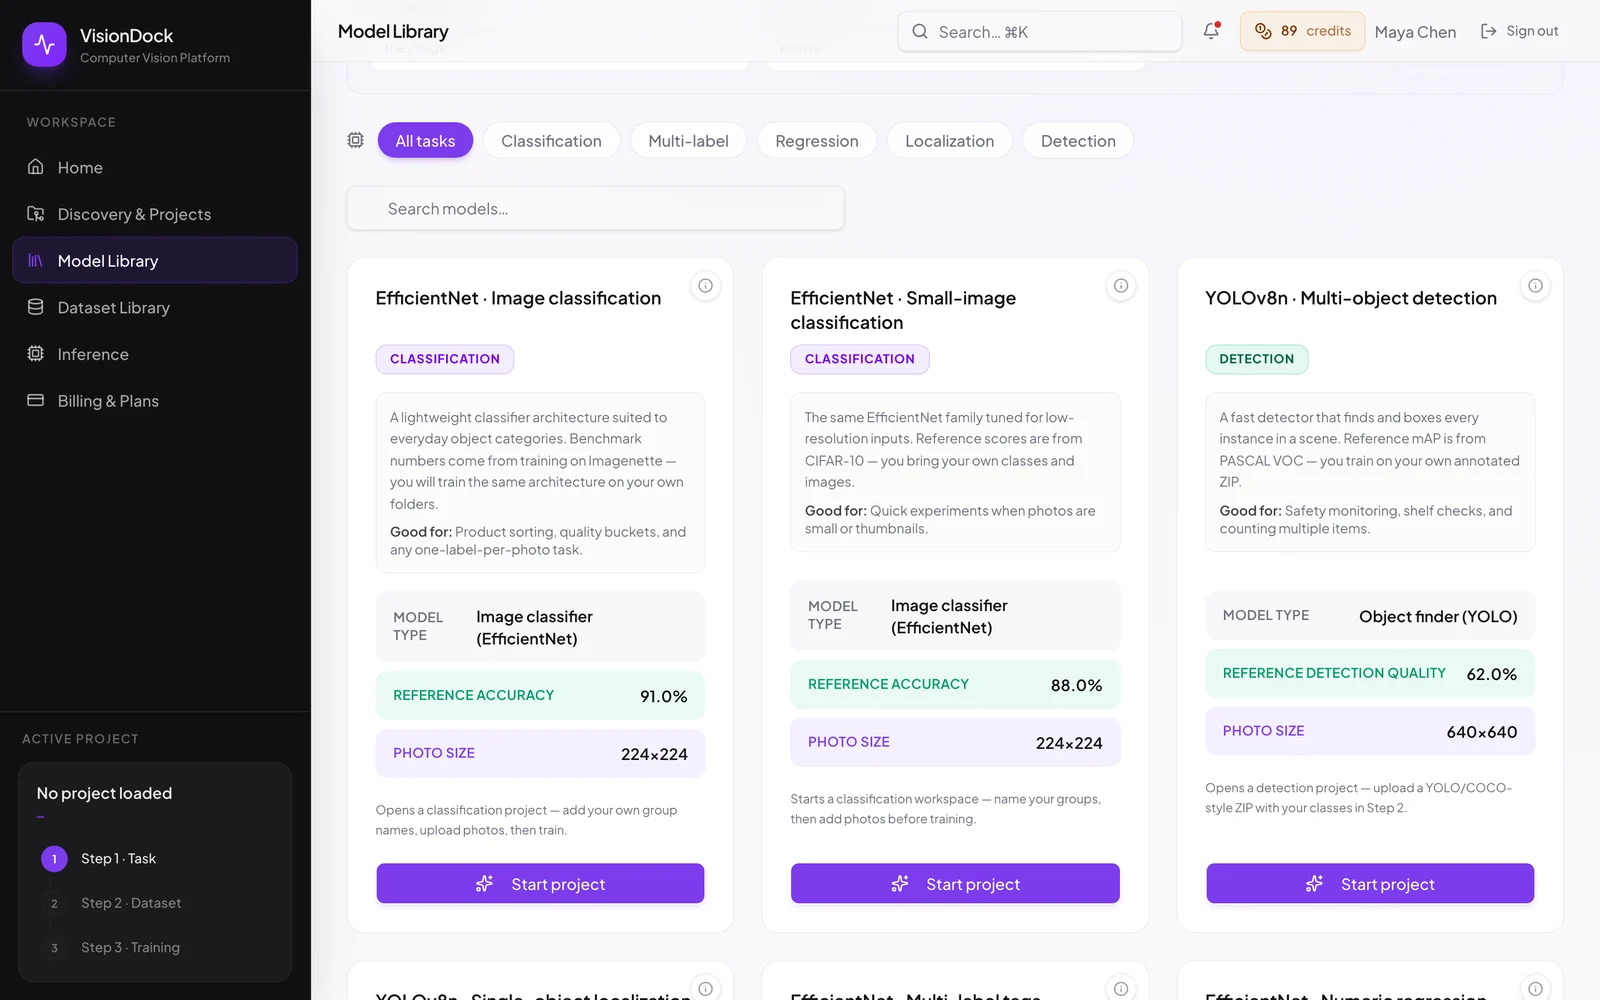
Model Library: EfficientNet and YOLOv8n architecture cards with reference accuracy, model type and photo size

Model Library

Proven architectures such as EfficientNet and YOLOv8, each with recommended settings for a task. Start a project from a card, name your own groups and train on your data.

  • Recommended architecture per task type
  • Reference scores shown on every card
  • Preconfigured for your own labels

FAQ

Common questions

Do I need to know machine learning?

No. The discovery chat recommends the task type and labels, and training settings are chosen automatically from your images. Advanced users can still change every parameter from the same screens.

How much data do I need?

VisionDock requires at least 5 photos per group to start, but that is a floor, not a target. For a reliable classifier, a few hundred images per group is a good starting point; for detection, the number of labelled boxes matters most. Not enough data? Start from a ready-made set in the Dataset Library.

Is there a labelling tool?

No. VisionDock learns from data you have already labelled. For detection and localization you upload an annotated ZIP in YOLO, COCO or VOC format, which virtually every labelling tool exports. Classification only needs a folder per group, and multi-label or regression only needs a simple CSV.

How long does training take?

It depends on dataset size and model. You see an estimated duration before a job starts, and progress is visible while training runs in the cloud.

How do I connect the model to my own systems?

After deployment you get a REST endpoint and an API key, and you call it with a file upload or base64 JSON. For detection you can pass confidence threshold, IoU, TTA, ensembling and SAHI parameters per request. For offline or edge scenarios, download the edge bundle and run it locally.

Is my data safe? Who can see it?

Your uploaded data and trained models belong only to your account and project; they are never added to the libraries or shared with other users. Access is controlled through verified accounts and API keys, which you can rotate or revoke at any time.

In short

From sample photos to a working vision model — in one flow.

Discovery, data checks, managed training and a live prediction API. No ML team, no servers to manage.